This Keyword in JavaScript

This Keyword in JavaScript

02 April 20234 min readWeb Programming

This keyword is the scariest part of JavaScript. Yes, this is one of the most confusing topics so why is this confusing? because its value can sometimes seem unpredictable. There are rules that determine the value of this structure, and once we learn these rules, the concept of this will not confuse us. So in order to approach with a logic, we must first know the rules. First of all, in JavaScript the this keyword refers to an object and it refers to the object that is currently calling the function. When we type this it will give you back an object. So depending on the scope and the rules for how it works, this object changes. which is confusing.

So let's look at our first example. When we enter the console, we will get an object from here.

function messageHello() {
  console.log("HI");
  console.log(this);
}

messageHello();

output:

// HI
// Window {}

We see object named hello and window. Window is the global scope in our browser. We cannot assume that every time you write this to a function, it will refer to the window. in the above function this refers to the window.

Implicit Binding

This is the most widely used. Let's examine this example.

const person = {
  name: "onur",
  age: 20,
  sayName() {
    console.log(this);
    console.log(this.name);
  },
  sayAge() {
    console.log(this);
    console.log(this.age);
  },
};

person.sayName();
person.sayAge();

output:

{name: "onur", age: 20, sayName: ƒ}
onur
{name: "onur", age: 20, sayName: ƒ}
20

in the first example we got the Window object, the global execution context and the global scope. in the second example this refers to the person object.

It allows us to reference properties or other methods. So we can have a method that is aware of other contents in its object.

In our second example, this refers to whatever is to the left of the dot. And that's all you really need to know about it. Whatever is to the left of the point is the object of which the function is a property. we call it Implicit binding. why this is called Implicit binding? because it is not clear how this will behave at the moment.

Exclicit Bindings

Here we specify what this will display without calling the function. that is, we determine exactly what the this keyword should represent. We have 3 functions to do this. These are call(), apply(), bind()

const fighter1 = {
  name: "jon",
  age: 36,
  class: "Heavyweight",
};

const fighter2 = {
  name: "Alex",
  age: 35,
  class: "Middleweight",
};

const fighterInfo = function (...skill) {
  console.log(this);
  console.log(
    `Fighter name: ${this.name} Fighter Age: ${this.age} Class: ${this.class}`,
  );
  console.log(`Fighting skills ${skill}`);
};

fighterInfo.call(fighter1, "Jiu-Jitsu", "Muaythai");
fighterInfo.apply(fighter1, ["Box", "Jiu-Jitsu"]);

const champ = fighterInfo.bind(fighter2, ["Jiu-Jitsu", "Box", "Muaythai"]);
champ();

output:

{name: 'jon', age: 36, class: 'Heavyweight'}
Fighter name: jon Fighter Age: 36 Class: Heavyweight
Fighting skills Jiu-Jitsu,Muaythai
{name: 'jon', age: 36, class: 'Heavyweight'}
Fighter name: jon Fighter Age: 36 Class: Heavyweight
Fighting skills Box,Jiu-Jitsu
{name: 'Alex', age: 35, class: 'Middleweight'}
Fighter name: Alex Fighter Age: 35 Class: Middleweight
Fighting skills Jiu-Jitsu,Box,Muaythai

New Binding

function Person(name, age) {
  this.name = "my name is " + name;
  this.age = age;
  console.log(this.name);
  console.log(name);
}

const person1 = new Person("Conor", 32);

output:

my name is Conor
Conor

it allows us to assign the person to the object we are instantiating. first person here will be the keyword this.

this.age = age; then a brand new object is created. in that,

const testing = {
  name: "name",
  age: "age",
};

Arrow Function

We can do lexical scoping with arrow functions.

example:

const sayHi = {
  name: "Angelina",
  age: 40,
  hi: function () {
    var inside = () => {
      console.log("Hi " + this.name);
    };
    return inside();
  },
};

sayHi.hi();
output: Hi Angelina

We see that this in arrow functions is lexically inherited. If we didn't use an arrow function, that is, a normal function, it would usually be the window object we never wanted. Since arrow functions do not have this, the use of methods such as call, apply, bind does not give the desired result. In such cases, we should use the classical function.

That is all. happy coding.

What is a Callback Function in JavaScript

What is a Callback Function in JavaScript

31 March 20232 min readWeb Programming

Callbacks are functions passed to other functions to be called inside the outer function. it is any function called by another function using a parameter. when we pass a function to another function and it is executed in that function, we can call it a callback. Callbacks are used a lot in coding. callback is very useful for asynchronous behavior where we want an event to occur when an event is completed.

Let's take a quick look at a simple example.

function testHi(test) {
  test();
  test();
  test();
}

function message() {
  console.log("hello world!");
}
testHi(message);

output:

hello world!

hello world!

hello world!

in this example message is a callback

Let's examine our example that prints the entered color on the console screen.

function writeColor(color) {
  console.log("Color: " + color);
}

function color(callback) {
  let color = prompt("enter a color.");
  callback(color);
}

color(writeColor);

Let's do another example. We take two values ​​and print them to the screen as lowercase and uppercase letters.

function user(username, email) {
  console.log("username: " + username + " " + "email: " + email);
}
user("onur", "onur@onurtaskiran.com");

function User2(username, email, callback) {
  const user =
    "username: " +
    username.toUpperCase() +
    " " +
    "email: " +
    email.toUpperCase();
  callback(user);
}

User2("onur", "onur@onurtaskiran.com", function (mail) {
  console.log(mail);
});

output:

username: onur email: onur@onurtaskiran.com
username: ONUR email: ONUR@ONURTASKIRAN.COM

We use callbacks a lot in javascript so we can do asynchronous programming.

CSS Grid

CSS Grid

02 January 20234 min readWeb Programming

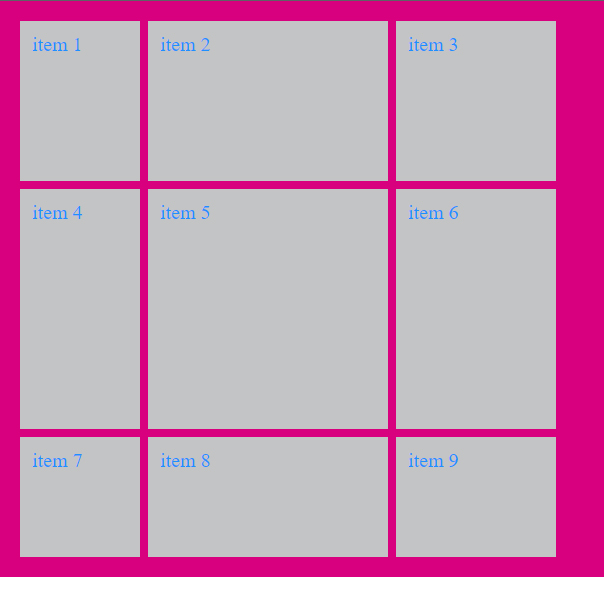
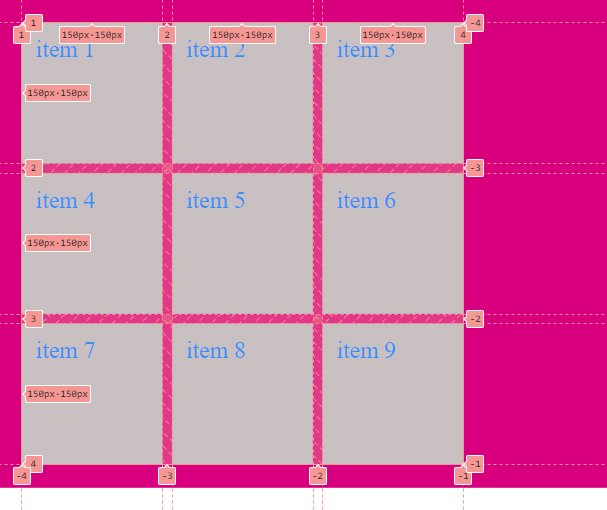
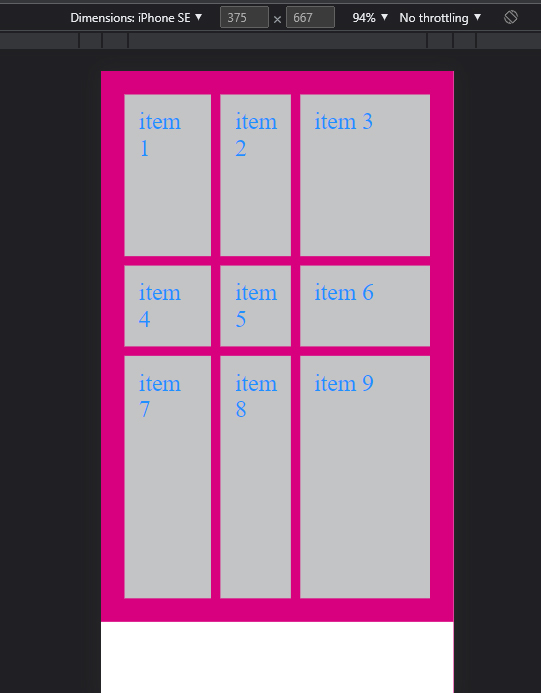
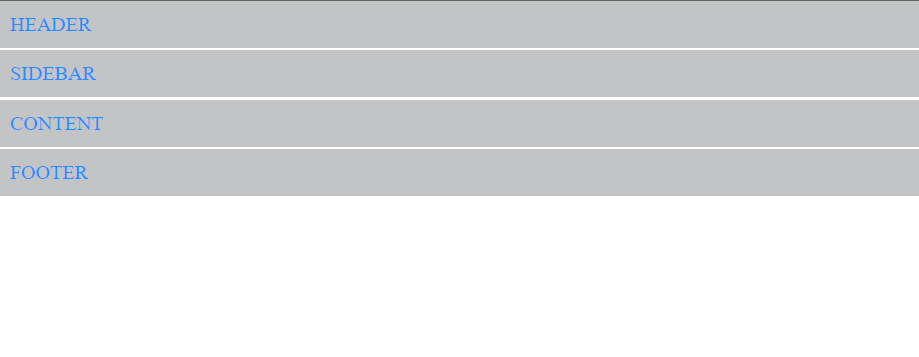
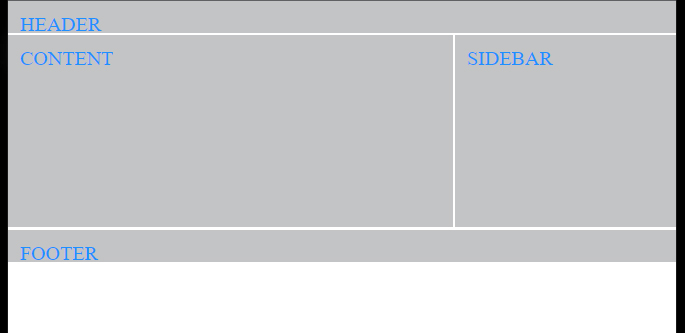
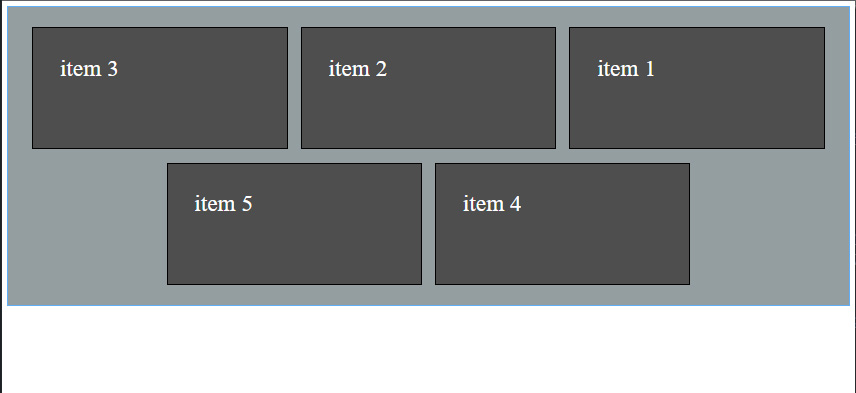
We can create a website template very easily with Grid. We can design the whole website with basic css methods such as float, display position or flexbox, but the Grid system is much easier. And it makes our job a lot easier. While Flexbox can do our one-dimensional coding, in the grid model, we can code in both dimensions. We usually use columns and rows when creating the grid structure. We do not have to use the css grid in all of our designs. For example we can make menus with flexbox. So we can make the general design of our page with css grid.

First of all, display: grid; we run the system. In other words, we give our items a grid feature.

<!DOCTYPE html>
<html lang="en">
<head>
    <meta charset="UTF-8">
    <meta http-equiv="X-UA-Compatible" content="IE=edge">
    <meta name="viewport" content="width=device-width, initial-scale=1.0">
    <title>Document</title>
    <style>
        body {
            margin: 0;
        }
        .container {
            display: grid;
            padding: 25px;
            background-color: rgb(216, 0, 126);
        }
        .item {
            padding: 15px;
            margin: 10px;
            font-size: 25px;
            background-color: rgb(195, 196, 197);
            color:dodgerblue;
        }
    </style>
</head>
<body>
    <div class="container">
        <div class="item">item 1</div>
        <div class="item">item 2</div>
        <div class="item">item 3</div>
        <div class="item">item 4</div>
        <div class="item">item 5</div>
        <div class="item">item 6</div>
        <div class="item">item 7</div>
        <div class="item">item 8</div>
        <div class="item">item 9</div>
    </div>
</body>
</html>

output:

We add our grid-template-columns code and divide it into 3 columns

.container {
            display: grid;
            grid-template-columns: 150px 300px 200px;
            padding: 25px;
            background-color: rgb(216, 0, 126);
  }

output:

we set the height of our rows.

.container {
            display: grid;
            grid-template-columns: 150px 300px 200px;
            grid-template-rows:200px 300px 150px;
            padding: 25px;
            background-color: rgb(216, 0, 126);
        }

output:

when we delete margin information from our items

.item {
            padding: 15px;
            font-size: 25px;
            background-color: rgb(195, 196, 197);
            color:dodgerblue;
        }

output:

We have a gap property. The grid-gap property defines the size of the gap between the rows and columns in a grid layout.

.container {
            display: grid;
            grid-template-columns: 150px 300px 200px;
            grid-template-rows:200px 300px 150px;
            gap: 10px;
            padding: 25px;
            background-color: rgb(216, 0, 126);
        }

output:

when the same value repeats, we use the repeat function. 3 values ​​and each will be 150px

.container {
            display: grid;
            /* grid-template-columns: 150px 150px 150px;
            grid-template-rows:200px 150px 150px; */
            grid-template-columns: repeat(3,150px);
            grid-template-rows: repeat(3, 150px);
            gap: 10px;
            padding: 25px;
            background-color: rgb(216, 0, 126);
        }

output

Responsive design is not supported because we give pixel values. so we can use the concept of fraction.

 .container {
            display: grid;
            grid-template-columns: 2fr 1fr 3fr;
            grid-template-rows: 2fr 1fr 3fr;
            gap: 10px;
            padding: 25px;
            background-color: rgb(216, 0, 126);
        }

output:

When we build a website, we start with such an interface.

<!DOCTYPE html>
<html lang="en">
  <head>
    <meta charset="UTF-8" />
    <meta http-equiv="X-UA-Compatible" content="IE=edge" />
    <meta name="viewport" content="width=device-width, initial-scale=1.0" />
    <title>Document</title>
    <style>
      body {
        margin: 0;
      }
      .container {
        display: grid;
        gap: 3px;
      }
      .item {
        padding: 15px;
        font-size: 25px;
        background-color: rgb(195, 196, 197);
        color: dodgerblue;
      }
    </style>
  </head>
  <body>
    <div class="container">
      <div class="header item">HEADER</div>
      <div class="menu item">SIDEBAR</div>
      <div class="content item">CONTENT</div>
      <div class="footer item">FOOTER</div>
    </div>
  </body>
</html>

This is our general outline.

output:

Now we can easily design using the grid system.

<!DOCTYPE html>
<html lang="en">
  <head>
    <meta charset="UTF-8" />
    <meta http-equiv="X-UA-Compatible" content="IE=edge" />
    <meta name="viewport" content="width=device-width, initial-scale=1.0" />
    <title>Document</title>
    <style>
      body {
        margin: 0;
      }

      .container {
        display: grid;
        gap: 3px;
        grid-template-columns: repeat(12, 1fr);
        grid-template-rows: 40px 240px 40px;
      }
      .header {
        grid-column-start: 1;
        grid-column-end: 13;
        grid-column: 1 / 13;
        grid-column: 1 / -1;
      }

      .content {
        grid-column: 1 / span 8;
      }

      .sidebar {
        grid-column: span 4 / -1;
      }

      .footer {
        grid-column: 1 / span 12;
      }

      .item {
        padding: 15px;
        font-size: 25px;
        background-color: rgb(195, 196, 197);
        color: dodgerblue;
      }
    </style>
  </head>
  <body>
    <div class="container">
      <div class="header item">HEADER</div>
      <div class="content item">CONTENT</div>
      <div class="sidebar item">SIDEBAR</div>
      <div class="footer item">FOOTER</div>
    </div>
  </body>
</html>

output:

we split our page into 12 columns and the sidebar took up 4 worth of space and the content took up 8 worth of space. Just like we did in Botsrap.

Of course, we can also do it this way.

.content {
        grid-column: 1 / 8;
      }

      .sidebar {
        grid-column: 8/ -1;
      }

      .footer {
        grid-column: 1 / -1;
      }

Our output will still be the same.

Bye bye ✋

Happy New Year Welcome 2023

Happy New Year Welcome 2023

01 January 20232 min readReflections

Happy new year everyone. I hope your wishes come true in the new year. If you are a software developer, your education always continues. I'm currently developing myself on React. I hope I will be an expert react developer in the new year. I am in a great desire to learn given by my goals in the new year. Also, I am filled with an energy that I cannot stop in order to realize myself. This year, I will undertake very important projects. There will be tremendous changes in my life. I'm excited about what I'm about to accomplish.

2022 was the year of sports and software for me, and so will 2023. Since 2020, I have been devoting more time to my education. Learning new technologies gives pleasure and motivates people. We are in an ocean and there are many places to go. We can't always know everything. It's fine to say I don't know. I have been involved in many software and graphic design projects. I designed a magazine, catalog, brochure, business card logo, but there is still a lot I don't know in the field of graphics. I have coded a lot of software programs and websites, but there is still much that I do not know in the field of software. So I will continue to learn in the new year.

It's nice and important for a person to have goals. If you have no purpose in this life, the best advice I can give you is to use your mind. Because a person without a purpose does not use his mind. When you use your mind, you will find your purpose. Anyway, I don't want to write a personal development article. I wish you all a good year. Make 2023 the year you get everything you want. Good luck to everyone in the new year.

How to Use Flexbox in CSS

How to Use Flexbox in CSS

31 December 20227 min readWeb Programming

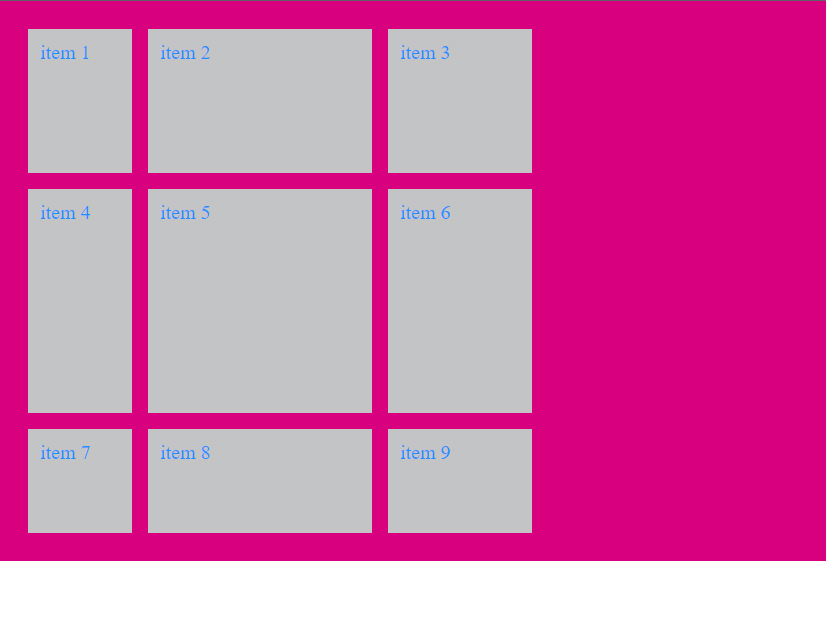
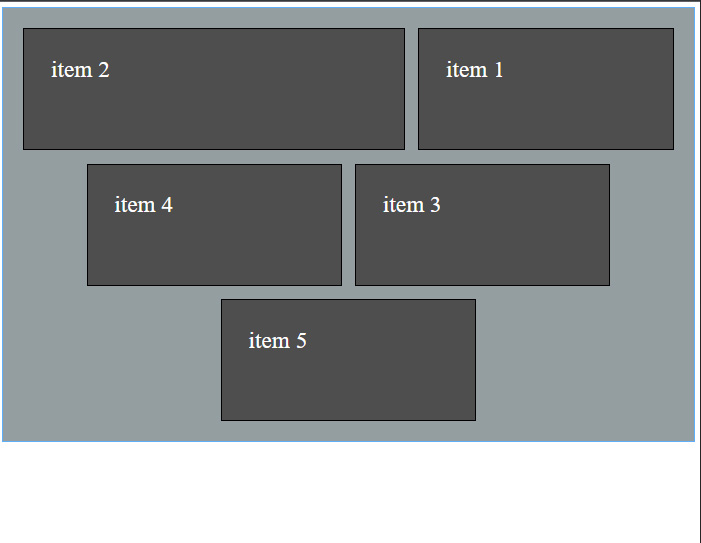
Why is Flexbox used? It allows us to design our website much more easily and effectively. With Flexbox, we can easily spread the width, height and order of the html elements to the field. Flexbox does this automatically for us without any overflow. Also, we can direct our items as we want. We can apply properties such as float, position, that we use in classical css very simply with flexbox. what we need to do is display: flex; write our code
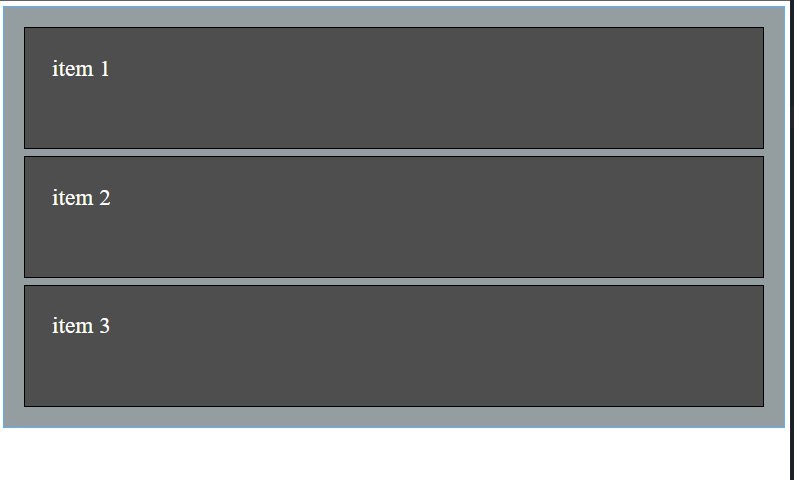
flex - direction;

We can list the items listed side by side one under the other
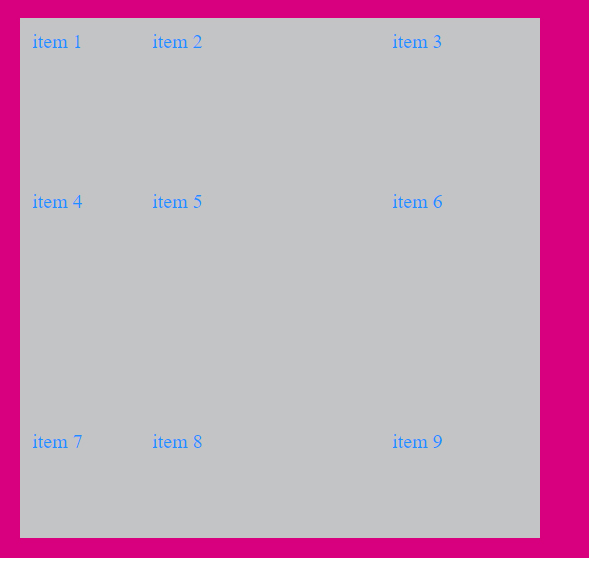
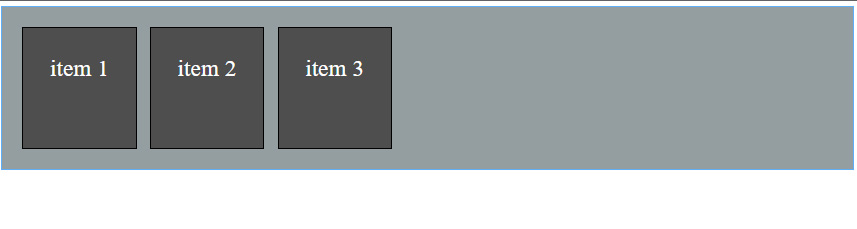
justify - content;

We can sort our items horizontally. We can give a certain distance between the elements and bring them to the beginning and the end.

flex - wrap;

when the screen width gets smaller our items go to the bottom

align - items;

We can align vertically.

align - content;

we can adjust the distance between each row.

align - self;

We can move each element individually.
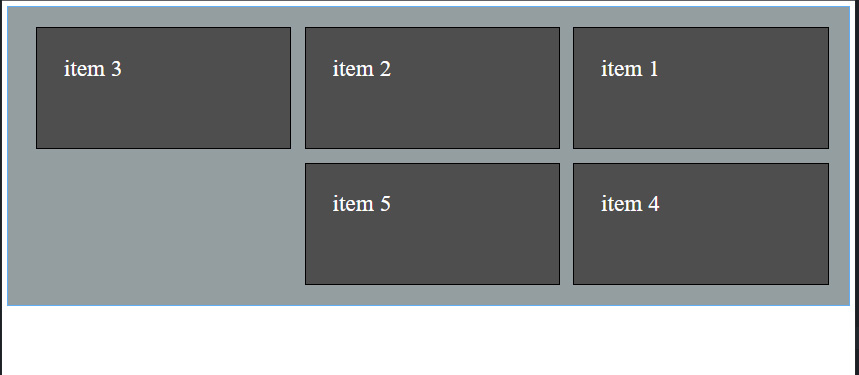
order;

we can sort

flex-grow:0

We can adjust how much our items grow when containers grow.

flex-shrink:1

We can adjust how much our items shrink when containers shrink.

we can initially give width attribute to each element.

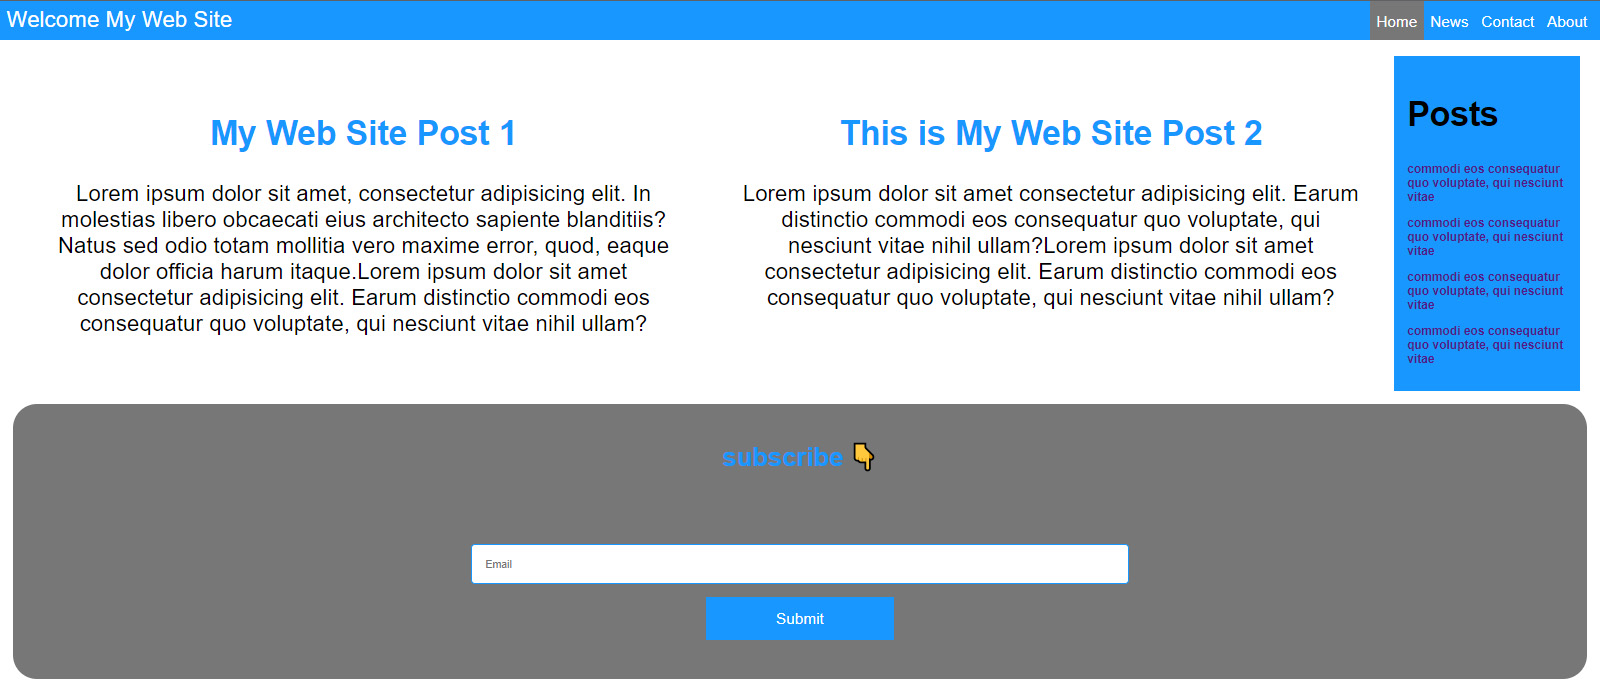
Let's create the containers and items of our web page.

<!DOCTYPE html>
<html lang="en">

<head>
    <meta charset="UTF-8">
    <meta name="viewport" content="width=device-width, initial-scale=1.0">
    <title>Flexbox</title>
</head>
<style>
    .container {
       background-color: rgb(148, 158, 161);
       border: 1px solid rgb(95, 174, 248);
       padding: 20px;

    }

    .item {
        background-color: rgb(78, 78, 78);
        padding: 40px;
        color: #fff;
        min-height: 100px;
        font-size: 35px;
        border: 1px solid black;
        margin:10px;
    }

    .item1 {

    }

    .item2 {

    }

    .item3 {

    }


</style>

<body>
    <div class="container">
        <div class="item item1">item 1</div>
        <div class="item item2">item 2</div>
        <div class="item item3">item 3</div>

    </div>
</body>

</html>

output picture

Now let's add display to our code

<!DOCTYPE html>
<html lang="en">

<head>
    <meta charset="UTF-8">
    <meta name="viewport" content="width=device-width, initial-scale=1.0">
    <title>Flexbox</title>
</head>
<style>
    .container {
       background-color: rgb(148, 158, 161);
       border: 1px solid rgb(95, 174, 248);
       padding: 20px;
       display: flex;
    }

    .item {
        background-color: rgb(78, 78, 78);
        padding: 40px;
        color: #fff;
        min-height: 100px;
        font-size: 35px;
        border: 1px solid black;
        margin:10px;
    }

    .item1 {

    }

    .item2 {

    }

    .item3 {

    }


</style>

<body>
    <div class="container">
        <div class="item item1">item 1</div>
        <div class="item item2">item 2</div>
        <div class="item item3">item 3</div>

    </div>
</body>

</html>

output

As you can see, our items came side by side. Now we can move it however we want.

.container {
       background-color: rgb(148, 158, 161);
       border: 1px solid rgb(95, 174, 248);
       padding: 20px;
       display: flex;
       flex-direction: row-reverse;
    }

I added row-reverse and it aligns in reverse.

Now let's add flex-wrap.

    .container {
       background-color: rgb(148, 158, 161);
       border: 1px solid rgb(95, 174, 248);
       padding: 20px;
       display: flex;
       flex-direction: row-reverse;
       flex-wrap: wrap;
    }

output

As you can see, my items went to the bottom. Items that do not fit according to the screen shrinkage will be lowered.

.container {
       background-color: rgb(148, 158, 161);
       border: 1px solid rgb(95, 174, 248);
       padding: 20px;
       display: flex;
       flex-direction: row-reverse;
       flex-wrap: wrap;
       justify-content: center;
    }

output

By adding justify-content we have centered our elements as you can see. When the screen shrinks, the spaces from right to left will be equalized.

We can add flex-grow command to our items and make various settings.

<!DOCTYPE html>
<html lang="en">

<head>
    <meta charset="UTF-8">
    <meta name="viewport" content="width=device-width, initial-scale=1.0">
    <title>Flexbox</title>
</head>
<style>
    .container {
       background-color: rgb(148, 158, 161);
       border: 1px solid rgb(95, 174, 248);
       padding: 20px;
       display: flex;
       flex-direction: row-reverse;
       flex-wrap: wrap;
       justify-content: center;
    }

    .item {
        background-color: rgb(78, 78, 78);
        padding: 40px;
        color: #fff;
        min-height: 100px;
        min-width: 300px;
        font-size: 35px;
        border: 1px solid black;
        margin:10px;
    }

    .item1 {
        flex-grow: 0;
    }

    .item2 {
        flex-grow: 1;
    }

    .item3 {
        flex-grow: 0;
    }

    .item4 {
        flex-grow: 0;
    }

    .item5 {
        flex-grow: 0;
    }


</style>

<body>
    <div class="container">
        <div class="item item1">item 1</div>
        <div class="item item2">item 2</div>
        <div class="item item3">item 3</div>
        <div class="item item4">item 4</div>
        <div class="item item5">item 5</div>

    </div>
</body>

</html>

output

We can specify the order of our items by giving the order value.

.item1 {
        flex-grow: 0;
        order: 3;
    }

    .item2 {
        flex-grow: 1;
        order: 1;
    }

    .item3 {
        flex-grow: 0;
        order: -2;
    }

    .item4 {
        flex-grow: 0;
        order: -1;
    }

    .item5 {
        flex-grow: 0;
        order: 2;
    }

I built a simple website using flexbox.

my html codes

<!DOCTYPE html>
<html lang="en">
  <head>
    <meta charset="UTF-8" />
    <meta http-equiv="X-UA-Compatible" content="IE=edge" />
    <meta name="viewport" content="width=device-width, initial-scale=1.0" />
    <link rel="stylesheet" href="style.css" />

    <title>Flexbox Web Site</title>
  </head>
  <body>
    <div class="header">
    <div class="slogan">Welcome My Web Site</div>
      <nav class="menu">
        <ul class="links">
          <li class="link"><a href="#home">Home</a></li>
          <li class="link"><a href="#news">News</a></li>
          <li class="link"><a href="#contact">Contact</a></li>
          <li class="link"><a href="#about">About</a></li>
        </ul>
      </nav>
    </div>

    <main class="m-container">
      <div class="m-item">
        <h2>My Web Site Post 1</h2>
        <p>
          Lorem ipsum dolor sit amet, consectetur adipisicing elit. In molestias
          libero obcaecati eius architecto sapiente blanditiis? Natus sed odio
          totam mollitia vero maxime error, quod, eaque dolor officia harum
          itaque.Lorem ipsum dolor sit amet consectetur adipisicing elit. Earum
          distinctio commodi eos consequatur quo voluptate, qui nesciunt vitae
          nihil ullam?
        </p>
      </div>
      <div class="m-item">
        <h2>This is My Web Site Post 2</h2>
        <p>
          Lorem ipsum dolor sit amet consectetur adipisicing elit. Earum
          distinctio commodi eos consequatur quo voluptate, qui nesciunt vitae
          nihil ullam?Lorem ipsum dolor sit amet consectetur adipisicing elit. Earum
          distinctio commodi eos consequatur quo voluptate, qui nesciunt vitae
          nihil ullam?
        </p>
      </div>
      <div class="latest">
        <h2>Posts</h2>
        <a href="#"><h3>commodi eos consequatur quo voluptate, qui nesciunt vitae</h3></a>
        <a href="#"><h3>commodi eos consequatur quo voluptate, qui nesciunt vitae</h3></a>
        <a href="#"><h3>commodi eos consequatur quo voluptate, qui nesciunt vitae</h3></a>
        <a href="#"><h3>commodi eos consequatur quo voluptate, qui nesciunt vitae</h3></a>

      </div>


    </main>

    <div class="subscribe">
      <h2>subscribe 👇</h2>
      <form action="#" class="form">
        <input type="text" placeholder="Email" />
        <button>Submit</button>
      </form>
    </div>
  </body>
</html>

output

mobile output

onurtaskiran

my css codes

*{
    font-family: 'arial', arial, helvetica;
}


body{
    margin: 0;
    padding: 0;
    font-size:28px;
}

h3 {
    font-size: 15px;
    text-decoration:none;

}
a{
    text-decoration:none;
}

.header{
    background-color: #1897ff;
    color: #fff;
    padding:0 .5rem;
    display:flex;
    align-items:center;
    justify-content:space-between;

}

.menu{
    display: flex;
    flex-wrap: wrap;
    flex-grow:-1;
}

.menu ul{
    list-style:none;
    display:flex;

}

.menu ul li{
    flex-grow: 1;

}

.menu ul li a{
    font-size:1.2rem;

}

.links{
    margin:0;
    list-style:none;
    display:flex;
    flex-wrap: wrap;
}

.link{
    padding:.5rem;
}
.link:hover{
    background-color: #777;
}

.link a{
    text-decoration:none;
    color:inherit;
}


.m-container {
    display: flex;
    flex-wrap: wrap;
    padding-top: 20px;
    padding-left: 25px;
    padding-right: 25px;

}

.m-item{
    padding:2%;
    text-align: center;
    flex:1;
    flex-grow: 1;
    flex-basis: 0;
}
.m-item h2{
    color: #1897ff;
}
.m-item p{
    margin-top: 5px;
}

.latest{
    padding: 1rem;
    text-align: left;
    align-self: stretch;
    justify-content: center;
    flex-basis: 200px;
    flex-shrink: 0;
    background-color: #1897ff;
}

.subscribe{

    margin: 1rem;
    display: flex;
    justify-content: center;
    flex-wrap: wrap;
    background-color: #777;
    border-radius: 30px;
    flex-direction: column;
}
.subscribe h2{
    text-align: center;
    padding:1rem;
    font-size: 2rem;
    color:#1897ff;
}

.form{
    padding:3rem;
    display:flex;
    align-items: center;
    flex-direction: column;
    width:40%;
    margin:auto;
}

.form input, .form textarea{
    padding:1rem;
    width:100%;
    outline:none;
    border:1px solid  #1897ff;
    border-radius: .3rem;
}
.form button{
    background-color:#1897ff;
    padding:1rem;
    margin-top:1rem;
    color:white;
    width:30%;
    border:none;
    font-size:1.2rem;
}


@media all and (max-width:600px){
    .header{
        flex-direction: column;
        text-align: center;
    }
    .latest{
        flex-direction: column;
        align-self: stretch;
        justify-content: center;
        flex-basis: 300px;
        flex-shrink: 0;
    }
    .menu ul{
        flex-direction: column;
        padding-top:1rem;
    }
    .main-content {
        flex-direction: column;
        padding:2%
    }
}
How to undo the last wrong commit on GitHub?

How to undo the last wrong commit on GitHub?

16 December 20221 min readWeb Programming

When we send what we need to send to Github, there is an easy way to get it back. sometimes i can send wrong commit. That's when I immediately delete the commits and post them again. We can undo as many commits as we want from both local and remote repository.

First, let's send the wrong commit

git add .
git commit -m "false commit"
git push origin master

The first code we will write will undo the local repository by one commit

git reset --hard Head~1

If you want to delete more commits, you can increase the number after Head~.

Now let's undo the commit from github too... This is very simple to do. We just add a plus to the beginning of the master in our git push origin master code.

git push origin +master

When you do this, we are doing a force update. So, we cleared both local and remote repository from the last commit.

Keep coding.

Getting Requests From REST API With Fetch and Axios in React

Getting Requests From REST API With Fetch and Axios in React

11 December 20222 min readWeb Programming

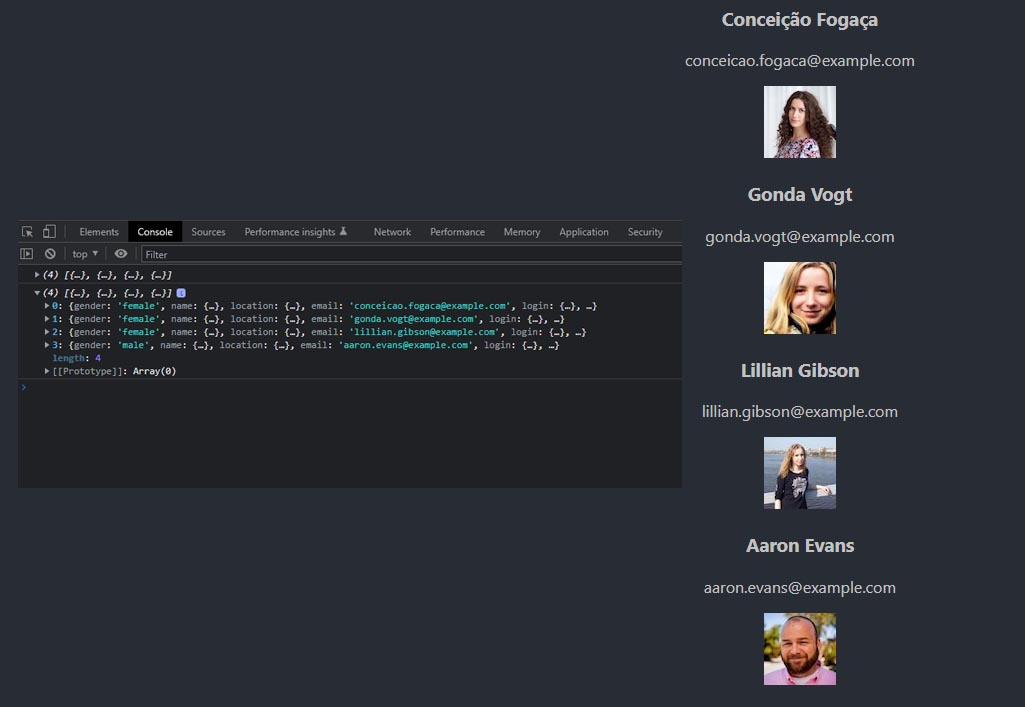
Pulling data from the api with React is very important because we almost always use api requests in large projects. We can do this very easily with axios or fetch. I prefer axious which is easier to use. So what are we going to do here? We will make api request with axios or feth in useEffect. We use it in useEffect because it is asynchronous. It is important what the answer from the api is. Since the answer here is array, we initialize usState with an empty array. We also catch an error with catch.

import "./App.css";
import React, { useEffect, useState } from "react";
import axios from "axios";

function App() {
  const [users, setUsers] = useState([]);
  useEffect(() => {
    axios
      .get("https://randomuser.me/api/?results=4")
      .then((res) => {
        console.log(res.data.results);
        setUsers(res.data.results);
      })
      .catch((err) => {
        console.log(err);
      });
  }, []);

  return (
    <div className="App">
      {users.map((user) => {
        return (
          <div key={user.name.first}>
            <h3>
              {user.name.first} {user.name.last}
            </h3>
            <p>{user.email}</p>
            <div>
              <img src={user.picture.medium} alt="" />
            </div>
          </div>
        );
      })}
    </div>
  );
}

export default App;

When we want to fetch data with fetch, we need to make json. We do this with fetch's own method, .json(), within the then method.

import "./App.css";
import React, { useEffect, useState } from "react";

function App() {
  const [users, setUsers] = useState([]);

  useEffect(() => {
    fetch("https://randomuser.me/api/?results=7")
      .then((res) => res.json())
      .then((res) => setUsers(res.results));
  }, []);

  return (
    <div className="App">
      {users.map((user) => {
        return (
          <div key={user.name.first}>
            <h3>
              {user.name.first} {user.name.last}
            </h3>
            <p>{user.email}</p>
            <div>
              <img src={user.picture.medium} alt="" />
            </div>
          </div>
        );
      })}
    </div>
  );
}

export default App;

Output:

onurtaskiran

Keep coding.

Red Dead Redemption 2

Red Dead Redemption 2

10 December 20223 min readVideo Game

This game, which gives us a life almost like in the real world, is beyond legendary to me. Rockstar Games has produced this game perfectly. When I played this video game, I felt like I was living in a real life. It really sends you to another world. If I were to criticize and disparage the game, I would have nothing to say. I won't tell you what I found anyway

What I found in this game is excellent graphics, quality cinematic, nice dialogues with the characters, realistic story and more. I never got bored playing this video game. And then, none of the Missions seemed silly to me. It is very realistic and there are many details, for example, you modeled your hair short and when you want to grow it again, you expect your hair to grow like in real life Or If you do not take an animal you hunted to the butcher for a long time, the meat of the animal begins to rot and becomes worthless or If your horse is injured. And you cannot heal it, your horse dies etc.

There may be robbers who block your way in the game, and sometimes gangs of children can trap you or rich people trying to lock their dirty work on you. There is everything expected from such a world in this game. If you haven't played Red Dead Redemption 2 yet, you should.

onurtaskiran

ABOUT THIS GAME America, 1899. The end of the wild west era has begun as lawmen hunt down the last remaining outlaw gangs. Those who will not surrender or succumb are killed.

onurtaskiran

After a robbery goes badly wrong in the western town of Blackwater, Arthur Morgan and the Van der Linde gang are forced to flee. With federal agents and the best bounty hunters in the nation massing on their heels, the gang must rob, steal and fight their way across the rugged heartland of America in order to survive. As deepening internal divisions threaten to tear the gang apart, Arthur must make a choice between his own ideals and loyalty to the gang who raised him.

From the creators of Grand Theft Auto V and Red Dead Redemption, Red Dead Redemption 2 is an epic tale of life in America at the dawn of the modern age.

SYSTEM REQUIREMENTS

MINIMUM: Requires a 64-bit processor and operating system OS: Windows 7 - Service Pack 1 (6.1.7601) Processor: Intel® Core™ i5-2500K / AMD FX-6300 Memory: 8 GB RAM Graphics: Nvidia GeForce GTX 770 2GB / AMD Radeon R9 280 3GB Network: Broadband Internet connection Storage: 150 GB available space Sound Card: Direct X Compatible

RECOMMENDED: Requires a 64-bit processor and operating system OS: Windows 10 - April 2018 Update (v1803) Processor: Intel® Core™ i7-4770K / AMD Ryzen 5 1500X Memory: 12 GB RAM Graphics: Nvidia GeForce GTX 1060 6GB / AMD Radeon RX 480 4GB Network: Broadband Internet connection Storage: 150 GB available space Sound Card: Direct X Compatible

JavaScript Array Reduce

JavaScript Array Reduce

06 December 20222 min readWeb Programming

It is used to reduce the array to a single value and does not change the original array. We can do everything we do with map, filter, find with this structure. The easiest example to understand is to return the sum of all elements in an array with reduce. First, let's find the sum of the elements of this array using the classical method.

const numbers = [1, 2, 3, 4, 5];

function result() {
  let total = 0;
  for (let i = 0; i < numbers.length; i++) {
    total = total + numbers[i];
  }
  console.log(total);
}

result();

Output: 15

Now let's do it with reduce.

const numbers = [1, 2, 3, 4, 5];

const result = numbers.reduce(function (total, curr, index) {
  return (total = total + curr);
}, 0);

console.log(result);

Output: 15

We multiply the elements of the array by two with map.

const numbers = [1, 2, 3, 4, 5];

const newResult = numbers.map(function (number) {
  return number * 2;
});

console.log(newResult);

Output: [2, 4, 6, 8, 10]

We can do this same structure with reduce.

const numbers = [1, 2, 3, 4, 5];

const newResultwithReduce = numbers.reduce(function (
  PreviousStatus,
  currentNumber,
) {
  PreviousStatus.push(currentNumber * 2);
  PreviousStatus;
  return PreviousStatus;
}, []);

console.log(newResultwithReduce);

Output: [2, 4, 6, 8, 10]

Initial value must be an empty array. then we got the current number multiplied by two with push. normally push returns the new element count after adding an element. Here we are coding it to send an array back. so the point here is to send a string back, not a number.

JavaScript Array map

JavaScript Array map

05 December 20222 min readWeb Programming

The map function processes the elements of the array or object one by one and returns them. So it's doing the conversion. We use it a lot when developing applications. With map, we change something and assign it to something new without breaking the existing structure.

const numbers = [1, 2, 3, 4, 5, 6];

const newNumbers = numbers.map(function (number) {
  return number * 2;
});

console.log(newNumbers);

Multiplies each element by 2 and returns.

Output: [2, 4, 6, 8, 10, 12]

We can use it with objects as well as with arrays.

const books = [
  { name: "1", pageNumber: 50 },
  { name: "2", pageNumber: 22 },
  { name: "3", pageNumber: 79 },
];

const PageNumbers = books.map(function (book) {
  return book.pageNumber;
});

console.log(PageNumbers);

Output: [50, 22, 79]

Objects with name and surname are kept in array. Let's print them as name and surname

const persons = [
  { name: "Marlon", surname: "Brando" },
  { name: "James", surname: "Dean" },
  { name: "Marilyn ", surname: "Monroe" },
];

const newNames = persons.map((person) => person.name + " " + person.surname);
console.log(newNames);

Output: ["Marlon Brando", "James Dean", "Marilyn Monroe"]

When we write this way, we don't use both curly braces and return statements.