I generally like period movies and TV series. Black Sails is one of the productions that best reflects its period. Costume design, set design, ships, etc. in the series. All extremely well done. The acting is very believable and quite good, especially Flint's acting is very good. This series was one where I felt like I was watching Pirates of the Caribbean.
While the series gradually explains the evil of Captain Flint, it also tells how John Silver, one of the interesting characters, gradually became a Pirate. The first season moves slowly. Keep watching even if you get bored and think of quitting. In the following episodes, the series reaches much better levels in terms of subject and shooting. Sometimes an episode can even have the quality of a movie.
There are people who have never heard of Black Sails. I think the value of the series is not understood enough because the effort and high-quality acting do not deserve so little attention.
Yes, I watched this series years ago. I think I'm longing for a series like this. If you are interested in a series full of historical adventure, pirates, political intrigue and complex characters, you should watch Black Sails, one of the best productions.
The music of the series is also great. I listen from time to time.
Storyline
"Black Sails" is a television series that originally aired from January 2014 to April 2017. It is a historical adventure television series created by Jonathan E. Steinberg and Robert Levine. The show is a prequel to Robert Louis Stevenson's novel "Treasure Island."
The series is set in the early 18th century and follows the story of Captain Flint, a feared pirate captain, and his crew as they navigate the dangerous waters of the Caribbean, dealing with rival pirates, British naval forces, and political intrigues.
"Black Sails" combines elements of historical fiction and adventure, providing a gritty and realistic portrayal of pirate life during the golden age of piracy. The show explores themes of power, ambition, loyalty, and the blurred lines between piracy and politics.
The main characters include Captain Flint, John Silver, Eleanor Guthrie, Charles Vane, and many others, each with their own motivations and goals within the pirate world.
The show received critical acclaim for its storytelling, characters, and production values, garnering a dedicated fan base during its run.
useReducer is a state management method in React, just like useState. It provides a structure and set of rules that lead to fewer errors and easier code management. We use it to handle more complex state logic and to perform state changes in a more structured way compared to useState. As your application grows in size, managing everything solely with useState can become quite challenging. In projects with multiple developers, you might encounter the use of useReducer.
The useReducer Hook takes two parameters: the reducer function and initial state values. The useReducer Hook returns an array of two elements: the first one is our state, and the second one is a dispatch function.
When making changes to the state, we send an action object into the dispatch function we execute.
If we want to update something, if we want to change this state value, we go with dispatch. We send an action object into Dispatch, and the action object necessarily takes a parameter called type, and we enter the change we want to make in the state into the type. Here we must provide the type property. We can also enter the data we want to save in the state in the payload section. Type is mandatory and payload is optional.
Getting used to the terminology might take a bit of time, so there's no need to stress ourselves. We just need to stay relaxed.
Let's examine a simple example of incrementing and decrementing a counter.
The useReducer function returns a state and a dispatch function used to update the state using a state management pattern called the "Reducer" function. The Reducer function is a function that updates the state based on specific actions and facilitates these updates.
For example, the usage of useReducer in a counter application is as follows:
Reducer is a function that specifies how the state should be updated based on different actions. The actions supported are 'addProduct', 'removeProduct', and 'resetCart'.
The ShoppingCart component renders a list of products with "Add to Cart" buttons.
It also displays the current contents of the cart (items added) and allows for removal of items.
The total price of the items in the cart is displayed.
There's a "Reset Cart" button to reset the cart to its initial state.
Actions:
addProduct: Adds a product to the cart along with its price and updates the total.
removeProduct: Removes a product from the cart based on its id and updates the total.
resetCart: Resets the cart to its initial state.
Event Handlers:
handleAddProduct: Dispatches an action to add a product to the cart.
handleRemoveProduct: Dispatches an action to remove a product from the cart.
handleResetCart: Dispatches an action to reset the cart.
The useReducer hook is used to manage the cart state and update it based on the actions dispatched. The ShoppingCart component renders the product list and cart, allowing users to add, remove, and reset the cart.
Context Api allows us to transfer data that each component can use. So the context api gives us global data. When transferring data through props in nested components, we have props hells with the branching method. To get rid of props hell, we define a Global data (context Api) so we can send the same data to all components via context api, no matter how many components we have.
For example, we have a nested structure. So we want to go to the Navbar and get the nav links first.
First of all, we create a components folder. And in this components folder, we create our Navbar.jsx file where we will show the data from the context. Here we want to use the context hook. Again, just like you mentioned use effect and others this also comes from React.
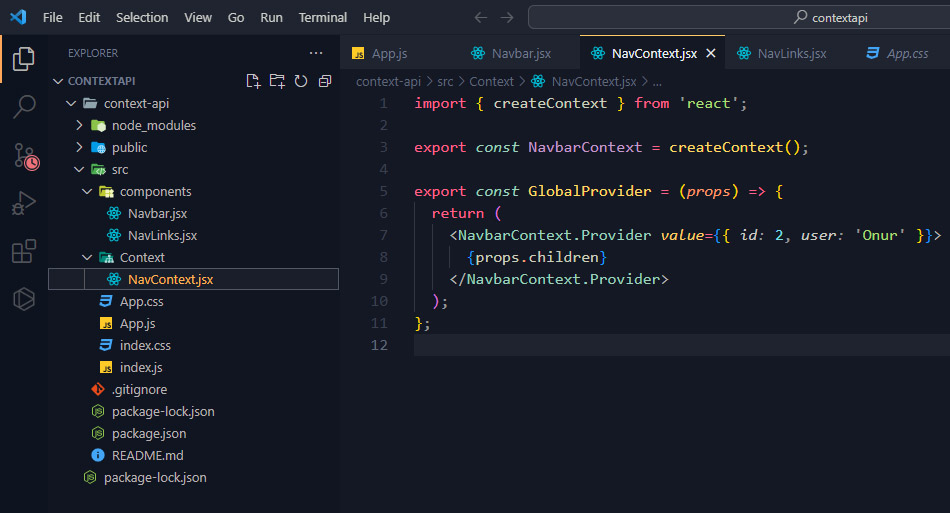
I create folder named Context and then I create my file named NavContext.jsx. Here I am creating the createContext. crateContext allows us to create context. I have sent the context structure I created to NavbarContext. then I return the data from the props, that is, we send the data from the props to children with the context's provider. We send this data as an object with value.
In order to use our components, we define GlobalProvider in our App.js file. and in between we define Navlinks and Navbar. So we can use our user, id number and links.
import "./App.css";
import Navbar from "./components/Navbar";
import NavLinks from "./components/NavLinks";
import { GlobalProvider } from "./Context/NavContext";

function App() {
  return (
    <div className="App">
      <GlobalProvider>
        <NavLinks />
        <Navbar />
      </GlobalProvider>
    </div>
  );
}

export default App;
Usually used to directly access a DOM element. We can make changes like we do in Valillajs. We can also be used to store a mutable value that does not cause rework when Updated. that is, changes made to the current value of UseRef will not re-render.
UseState triggers the component to be rendered again, but UseRef does not trigger the component to be rendered again. so you can use use useRef according to the project you are working on. although it is not used in every project, it has a very special use in some places.
We include it on our page as a priority.
import React, { useRef } from "react";
We declare a ref object whose initial value is null.
const inputRef = useRef(null);
Example:
When we click the button, our function will run and the focus function of the element we assigned to the inputRef will be called.
This way we use it to access the elements in the Dom.
Initial Render
Again, this is probably not something you'll use in every project, but it's essentially a nifty solution here where you can avoid running some functions after the initial render.
When it comes to using effects hook in React it allows us to perform side effect in function component. UseEffect lets you perform data fetching, updating the DOM directly, timers, and side effects such as state or variable changes in your components. useEffect is one of the most used hooks in react applications. By default, it runs after every render. On the first render and every re-render. So let's see how to use it. I mentioned useState in a previous post. If you haven't read that article, I suggest you read that article before reading this topic.
The first thing we're going to do is import the Hook.
import React, { useEffect } from "react";
We need to add useEffect to the top level of the function component.
useEffect(() => {
  console.log("hello from useEffect");
});
In this example, Hook will run after each commit.
useEffect(() => {
  console.log("hello from useEffect");
}, []);
When we add the array it will look at this array and when the elements inside this array change it will run the content. It will only run once as we are adding an empty array. so useEffect will work when the first component is loaded and will not work again.
useEffect(() => {
  console.log("hello from useEffect");
}, [counter]);
It will run every time it changes the value of the counter variable.
useEffect(() => {
  console.log("hello from useEffect");
}, [counter, counter1, counter2]);
If we want it to work after multiple variable changes, we can write it like this.
Effect Cleanup
If we have some kind of functionality that could possibly cause a problem. That's when we need to go back and set the cleanup function. We do this by adding a return function to the end of the useEffect Hook. Note that you won't need to set up cleanup functionality for every user effect.
function Counter() {
  const [count, setCount] = useState(0);

  useEffect(() => {
    const id = setInterval(() => {
      setCount(count + 1); // This effect depends on the `count` state
    }, 1000);
    return () => clearInterval(id);
  }, []); // Bug: `count` is not specified as a dependency

  return <h1>{count}</h1>;
}
Changing dependencies too often can lead to bugs. In order not to get an error, we need to enter setCount as a function. If you're returning something, React actually expects you to return a function. that is, we enter the change we want to make as a callback function.
function Counter() {
  const [count, setCount] = useState(0);

  useEffect(() => {
    const id = setInterval(() => {
      setCount((c) => c + 1); // This doesn't depend on `count` variable outside
    }, 1000);
    return () => clearInterval(id);
  }, []); // Our effect doesn't use any variables in the component scope

  return <h1>{count}</h1>;
}
useState is a React Hook that allows us to access state in function components. State refers to the data or properties that should be tracked in our project. useState allows us to use React's state property without writing a class. It has been included in the react library since v16.8 (in 2019). Before it was included in the react library, we had to write a class when we wanted to use state. With useState, we can write state management in our projects with very clean code.
First, we import the useState hook from React.
import { useState } from "react";
Then we make a value definition.
const [value, setValue] = useState();
We define setValue in updating a value definition. With useState, we define a state hook. So we can define it this way and we can't put any value in it or we can initialize it with zero. Apart from this, we can define an array, any value as an object.
We have two keywords Async and Await. We use async in front of a function declaration or function expression. The async keyword is used to define a particular function as an asynchronous function. When we put the Async keyword at the beginning of our function, we get a promise. We can now do anything we want inside this function, but since we use the word async to define this function, we have access to a new await keyword. We use the await keyword inside an async function and while waiting for a promise to resolve, we can stop the function from executing, so we can wait for something and then run the code after an asynchronous operation without needing anything with callbacks. that is, we are telling at which points of our code to act asynchronously.
Asynchronous functions are largely based on promises and are built on top of promises. If you don't know about promises in Javascript, I recommend you to review the promise post. You can come back here later. The benefit of async await is that it makes the code easier to read. With async await, the goal is to make the code appear synchronous. Code that is asynchronous appears synchronous.
We have our word and our users. Nothing different from what we promised. but we have code that looks nice and step-by-step synchronized. And the craziest part here is await axios.get and we save the value that the promise is resolved to in a variable.
So if there is an error in this structure, how will we catch it? We can't just use catch here. we enclose our code in try catches.
Promise is easier to write and implement than callbacks. A promise is simply an object that represents the completion or failure of a process. It's usually something that takes time. When we use a library like Axios we return a promise and when we request data from api this process may take time and this value may never come back, it may succeed or fail. You can get some data back from API, So at this time the returned object is a promise. most libraries support promises. For example, we can use promise in a library like axios.
JavaScript promises are a programming language feature used for asynchronous programming. They provide a cleaner and more readable way to handle asynchronous operations compared to traditional callback functions. Promises were introduced in ECMAScript 2015 (ES6) and have become a fundamental part of modern JavaScript development.
when we create a promise we pass a function. This function has two parameters. we usually call these two parameters resolve and reject. And these are actually functions. If we call resolve, the promise will be resolved. If we call reject, the promise will be rejected. If we do not reject or resolve a promise, its value or status will be pending. The first time an promise is returned, the first thing you will see is usually the pending status of an promise.
Every promise has a then method, if our promise is resolved it will work. This code runs and writes to console when this promise is resolved. we use another method, xxxx, to catch errors.
In our example above we caught the error using catch.
No matter what we pass into the then method, it will run automatically when a given promise is resolved, and whatever we pass into the catch method, the catch method will automatically run when a promise is rejected. We meet the incoming data with then and catch the error with catch.
Sometimes we can use promise in one line according to our needs. We can be used without creating (new Promise())
Consuming a Promise:
You can consume a promise using the then and catch methods. The then method is called when the promise is fulfilled, and the catch method is called when it is rejected.
myPromise
  .then((result) => {
    // Handle the successful result
  })
  .catch((error) => {
    // Handle the error
  });
Chaining Promises:
Promises can be chained together using multiple then calls, allowing you to perform a series of asynchronous operations in a more readable and sequential manner.
myPromise
  .then((result) => {
    // Do something with the result
    return anotherAsyncOperation(result);
  })
  .then((resultOfAnotherOperation) => {
    // Handle the result of the second operation
  })
  .catch((error) => {
    // Handle errors from any step in the chain
  });
Promise.all()
We enter the expected promises as an array and then it gives us the rendered results in a single array. Let's examine our example.
It gave us the result of our three promises as an array. the values are returned as an array in the order they were just written. i.e. it waited until all promises were resolved and then their values were output.
Promise.race()
Here, the promise that reaches the fastest result is taken as the value. Success (resolved) or unsuccessful (rejected) result does not affect the result.
I've been playing Mount & Blade II Bannerlord for a few days now. A great game to kill time. I can't understand how the time passes in the game. So I can play this video game for months, years without getting tired. One of the best of the genre. At the beginning of the game, we create the facial features and body structure of our character ourselves. I've always loved games that start like this. Because personalizing the character is important to me. There are 6 civilizations in Bannerlord. At the beginning of the game we have to choose civilization. Of course, every civilization has its pros and cons. I started by choosing the kuzaits. If you choose the empire, you will play much more comfortably. Yes, I chose the civilization that is closer to me and I can't say that I had a hard time.
They have also included a scenario mode so that we can get used to the game more easily. yes, we are left alone in the big world at first in the game and long adventures await us in this world.
What makes Mount & Blade II Bannerlord different from other games is that you create your own scenario, your own history in this game. The fighting animations are pretty good. Bannerlord offers pretty good combat experience. You really feel like you went to historical civilizations and participated in wars with those people.
Although I'm not someone who spends a lot of time on video games, if I find a video game I like, I will play it. I mean, I'm not like people who spend their lives in video games, and I don't want to be like those people. For me, playing a game you love is like watching a good movie in the style you love.
I care a lot about graphics in a game, but I didn't care about the graphic design of this game. Because Bannerlord is a very cleverly designed video game. The bad graphics are not too noticeable because you enjoy playing the game. Strategy games have been my favorite since childhood. I've played Total War Rome 2 a lot. and this game includes action as well as strategy. In other words, going into battles with your own soldiers and fighting one-on-one takes the game to very different points.
I congratulate TaleWorlds for releasing such a game. They really did a good job.
I must say that Bannerlord is a very addictive game. I stopped playing this game in order not to waste any more time, but whenever I want to kill time, I can say that this is the game I will go back to play. Would I recommend it to everyone? I would never recommend it to anyone who doesn't have the time. But if you like Strategy - Action game, you should play it at least once.
Yes, good software developers and designers should come together and produce good games, right? The world needs such things.
Description
The horns sound, the ravens gather. An empire is torn by civil war. Beyond its borders, new kingdoms rise. Gird on your sword, don your armour, summon your followers and ride forth to win glory on the battlefields of Calradia.
Set forth on an epic adventure in a fictional Dark Ages sandbox that combines strategy and action-RPG gameplay.
Create and develop your own character, gather companions, and use diplomacy, trade, and roguery to your advantage as you attempt to establish your clan among the ranks of the nobility.
Raise armies to command and fight alongside in huge, real-time battles and sieges using an extensive command system, and an intuitive, skill-based directional combat system.
Carve out your own kingdom or champion another’s cause as you explore the vast, reimagined continent of Calradia in this prequel to the critically acclaimed, Mount & Blade: Warband.
The concept of scope is quite easy and very important topic in javascript. So let's delve deeper into this issue. Scope is the ability of our other code pieces to access this value or not, depending on where the variable defined is located. In other words, we can access variables, objects, functions according to their scope in various parts of our code. There are several types of scopes in Javascript, they are: global scope, local scope, function scope, block scope, and lexical scope.
Global Scop
If our variable is defined outside the function it is a global scope
let name = "Onur";

function user() {
  console.log(name);
}

user();
output: Onur;
here our variable name has become global and we can access it from anywhere.
Local Scope
Defining a variable or function in the current code block is called local. so local scope is not limited to functions only.
let name = "Onur";

function user() {
  let lastName = "Taskiran";
}

user();
console.log("Last Name" + lastName);
output: ...Uncaught ReferenceError: lastName is not defined
In the above example we get an error because the scope of the lastName variable is inside the function. Actually, lastName is defined but it's defined in local Scope, so we can only access it inside the function. This is a good example of local scope
The correct code is as follows.
let name = "Onur";

function user() {
  let lastName = "Taskiran";
  console.log("name:" + name + " Last Name:" + lastName);
}

user();
Our variable name is local scope and lastName is global scope.
Function Scope
When we declare a variable inside a function, we can access the variable only within that function and cannot be used outside of that function.
Now let me give a good example of function scope.
function person() {
  let user = "Tom";
  const age = "30";
  console.log(age);
}

function otherList() {
  let category = "js";
  const age = "20";
  console.log(age);
}

person();
otherList();
output: 30;
20;
Block Scope
if (true) {
  let color = "blue";
}
console.log(color);
output: Uncaught ReferenceError: color is not defined
So what does this tell us? This tells us that our color variable is scoped inside the conditional element. The block scope is the scope shown inside the curly brackets set.
if (true) {
  let color = "blue";
  console.log(color);
}
output: blue;
That's how it works.
if i define my variable as var in my code
if (true) {
  var color = "blue";
}
console.log(color);
output: blue;
our code will work.
In javascript we used to only declare variables with var. If we declare a variable using var in any block, it will not be scoped to that block. and this can cause problems. This is one of the reasons let and const were added to create constants in JavaScript.
So why might this be problematic? What's wrong with a variable being accessible within a block? There are many reasons for this. Let's examine with an example
let color = ["Blue", "Dark", "Red"];
for (var i = 0; i < color.length; i++) {
  console.log(i, color[i]);
}
output:
0 'Blue'
1 'Dark'
2 'Red'
let color = ["Blue", "Dark", "Red"];
var i = 5;
for (var i = 0; i < color.length; i++) {
  console.log(i, color[i]);
}
console.log(i);
output:
0 'Blue'
1 'Dark'
2 'Red'
3
The variable i became 3 instead of 5. so this can cause us problems when we rely on a variable named i.
Since we are using Var, there is no block scope. so we have a hard time knowing exactly where we stand.
Now let's do it with let
let color = ["Blue", "Dark", "Red"];
var i = 5;
for (let i = 0; i < color.length; i++) {
  console.log(i, color[i]);
}
console.log(i);
output:
0 'Blue'
1 'Dark'
2 'Red'
5
At the bottom we see that the value of i is 5. because the variable i in the loop is only scoped to the block in the for loop.
Lexical Scope
Lexical scope is when a function scope accesses variables in the outer or parent scope.
function parent() {
  let color = "white";

  function child() {
    console.log(color);
  }
  child();
}

parent();
output: white;
So lexical scope is that nested functions are lexically linked.